How to Apply for Google Grants: A Complete Application Guide
If you’ve ever seen sponsored results for nonprofits appear on Google’s search engine results page, that’s likely thanks to the Google Ad Grant program. Ever since the program’s launch in 2003, Google donates free advertising to thousands of nonprofits every month— in fact, they’ve donated over $9 billion in total.
Every month, eligible nonprofits receive up to $10,000 in advertising credits that they can use to boost their website to the top of search results. This leads to increased brand visibility, additional website traffic, and access to brand new audiences of potential donors.
How can your nonprofit get in on the action? All you have to do is apply! However, it’s a lengthy process that can feel confusing at times, so we’ve broken it down into five simple steps you can easily follow:
- Meet the Google Ad Grant Requirements
- Set Up a Google for Nonprofits Account
- Wait for Verification From Percent.
- Optimize Your Website for the Google Grant Application
- Apply and Set Up Your Account
After we explore each step in more detail, we’ll also provide you with a few tips for making the process easy. Now, let’s dive into how to apply for Google Grants!

1. Meet the Google Ad Grant Requirements
Before you jump into creating accounts and filling out registration forms, check that you meet all of the Google Ad Grant requirements. Most nonprofits can become eligible for the Grant by making changes to their website, but there are a few types of organizations that are automatically ineligible:
- Government entities and organizations
- Healthcare organizations and hospitals
- Schools, universities, and other educational institutions
If your organization doesn’t fit into any of those categories, you can move on to the other requirements. If your school or university is interested in the Google Ad Grant, look into Google for Education instead.
The full list of requirements can be found on the Google Ad Grant website, but here are the main eligibility criteria you need to meet:
- Be a registered 501(c)(3) organization. If your nonprofit doesn’t operate in the United States, check the full list of requirements to find out what type of registration you need to qualify in your country.
- Own the domain of a secure, optimized website. Google needs to verify that your nonprofit’s website is in a position to achieve online advertising success. We’ll discuss website optimization tips later on.
- Receive verification from Percent. If you’re not already registered with Percent, the third-party organization Google partners with to verify nonprofits, we’ll cover what to expect in the next section.
- Agree to Google’s policies and terms of service. You’ll need to agree to the policies of both Google for Nonprofits and the Google Ad Grant program itself.
Once you confirm that you meet or have the ability to meet all of the Google Ad Grant requirements, you’re ready to move on to the next step.
2. Set Up a Google for Nonprofits Account
Once you meet the requirements, you’re ready to create a Google for Nonprofits account. This is the account you’ll use to access the final Google Ad Grant application forms.
Registering for Google for Nonprofits is necessary to apply for the grant, but it also gives your nonprofit access to additional useful tools like Google Workspace and the YouTube Nonprofit Program. These resources can help keep your team organized and allow you to use exclusive features like YouTube donation buttons.
To get set up and receive the benefits, follow these steps:
- Go to the Google for Nonprofits signup page.
- Agree to Google’s terms.
- Fill in your contact information and basic information about your nonprofit, such as your size and mission.
- Wait for the approval email.
This approval process is usually fast, but it can still take a few days. Make sure to check your email regularly to avoid missing your confirmation.
3. Wait for Verification From Percent.
If you’ve never heard of Percent, you’re probably wondering what it has to do with your Google Grant application.
Percent is an organization that connects charities with major brands. They verify nonprofits’ legitimacy for companies, so those companies can offer their products for free or at a discount to causes worldwide without concern.
For Google, Percent verifies that interested nonprofits are legitimate, registered 501(c)(3)s before they can proceed with the Google Grant application.
You don’t have to do anything additional to receive verification other than wait 2-14 business days. Keep an eye out for emails from the domain @poweredbypercent.com. Percent may reach out to you for more information or documentation to verify your organization. If you don’t receive anything from Percent, check your spam folder and contact Percent.
If you’re interested, you can also take advantage of the other benefits of being verified by Percent, like connecting with corporate partners and gaining exposure among individual donors.
4. Optimize Your Website for the Google Grant Application
While you wait for approval, take this time to make improvements to your website before submitting your Google Grant application. As mentioned earlier, your nonprofit must own the domain of a quality website in order to qualify for the grant.
What exactly does a quality website look like? For Google, this means more than just following basic nonprofit web design tips (though those are a great place to start!).
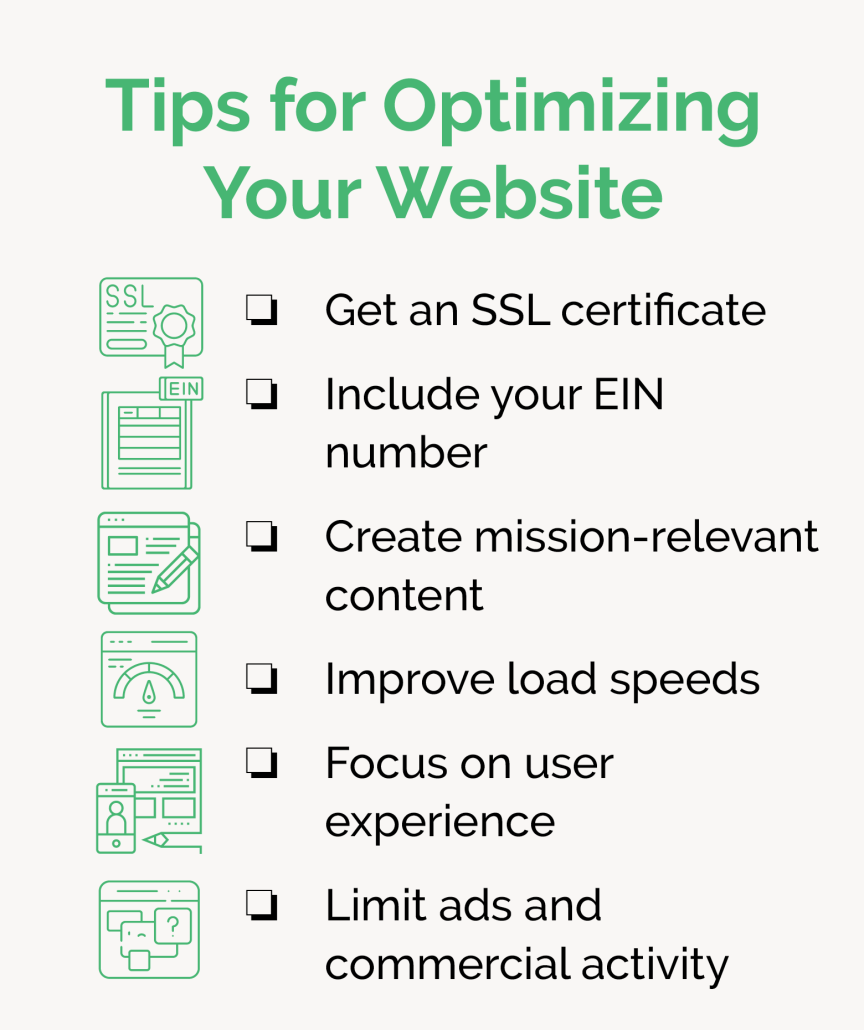
Specifically, it means that your website follows every Google Grant requirement for websites by having:
- HTTPS security: To get HTTPS to appear at the front of your website’s URL instead of HTTP, obtain an SSL certificate from an online Certificate Authority. This certificate implements a security protocol on your website that protects visitors.
- Clearly stated nonprofit status: Display your EIN number in your website’s footer or on your homepage so users can quickly verify your nonprofit status. Include plenty of easy-to-find information about your mission and work, as well.
- Cause-related content: All written and visual content on your website should be relevant to your nonprofit’s mission and valuable for your audience. Go through any outdated content and ensure it aligns with your current positioning.
- Optimized user experience: Improve user experience by speeding up page load times, adding alternative text to images, and using mobile-responsive web design.
- No commercial activity: Limit all sales and advertisements on your website, unless you can clearly state where the proceeds go, such as a product fundraiser supporting your latest initiative.
You can use this quick checklist to ensure you’ve met the above requirements:
While not required for the Google Grant application, it doesn’t hurt to go ahead and install Google Analytics on your website as well. This will be required to use the grant once you receive it, but it can also help you optimize your website ahead of time. Monitor metrics like bounce rates and conversion rates to learn which of your pages are performing well and which need special attention.
5. Apply and Set Up Your Account
Once your website is in the clear and your Google for Nonprofits registration is complete, you’re ready for the final step!
Filling out the official Google Grant application is fairly straightforward:
- Log in to your new Google for Nonprofits account.
- Navigate to the “Products” page, find Google Ad Grants, and click “Get Started.”
- Fill out the eligibility form and accept the program’s policies.
- Return to the homepage and click “Activate.”
On the eligibility form, be prepared to provide a link to your website and briefly explain what your nonprofit’s goals for using the program are. Also, we suggest avoiding entering any credit card or bank information at any point. You may be prompted to do so, but entering it could disrupt your application and cause problems later.
After completing the application, you should hear back within 3 business days about whether you’ve been approved. Once your account is activated, you can start setting up your account and creating your first ad campaign!
Don’t forget to refresh your knowledge of the program rules as you set up your account and start advertising. You need to stay compliant to retain your access to the grant and continue driving results for your nonprofit.
3 Tips to Make the Google Grant Application Process Easier
The Google Grant application process can feel overwhelming. With multiple different accounts you have to create, a long list of requirements to fulfill, and seemingly indefinite wait times, you may be wondering if there’s any way you can simplify things.
Fortunately, there is! Thousands of nonprofits have been in your shoes, and naturally, they’ve learned how to adapt to the application’s challenges. Use these three tips to improve your application experience:
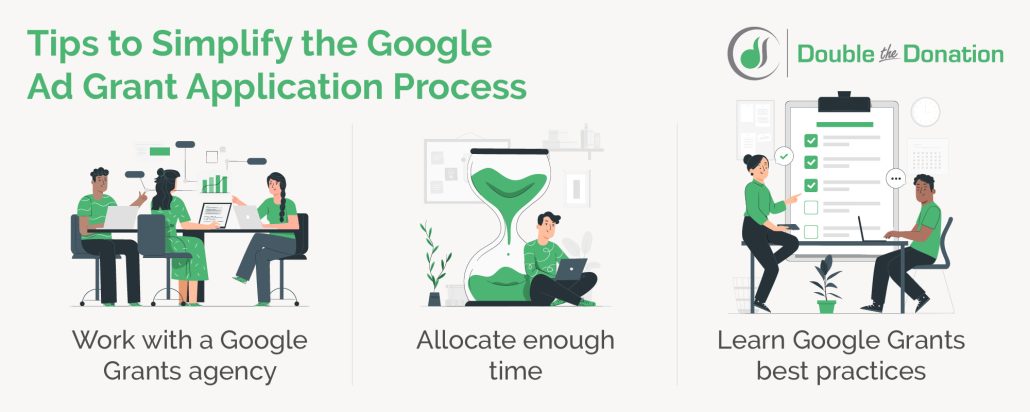
1. Work with a Google Grants agency
Don’t leave your Google Grant application up to chance! Getting help from professionals takes pressure off your staff and reduces the time and effort needed to apply for the grant successfully. Experts at a qualified Google Grants agency can:
- Confirm your eligibility
- Provide suggestions to improve your website’s landing pages
- Apply for the Google Grant
- Set up your account
- Manage and improve your ads
These professionals have experience working with nonprofits and know how to tailor advertising strategies to your specific needs. To get started, set up a consultation to discuss your questions, priorities, and goals for using the Google Grant. They’ll work with you every step of the way to ensure your nonprofit gets the most out of your grant.
We recommended Getting Attention. They’re a certified Google Ad Grant agency, which means they’ve been approved by those who run the Google Ad Grant program. By working with them, you’ll receive expert guidance to create successful ads and have a direct connection to Google if your account ever has issues.
2. Allocate enough time
If you and your staff aren’t prepared for the time commitment, you could end up feeling discouraged or even giving up on the Google Grant application altogether.
Make the application process easier on your staff by giving them an accurate picture of how long it will take to get approved for the grant. Take a look at this timeline and ensure you can set aside enough time to complete the process:
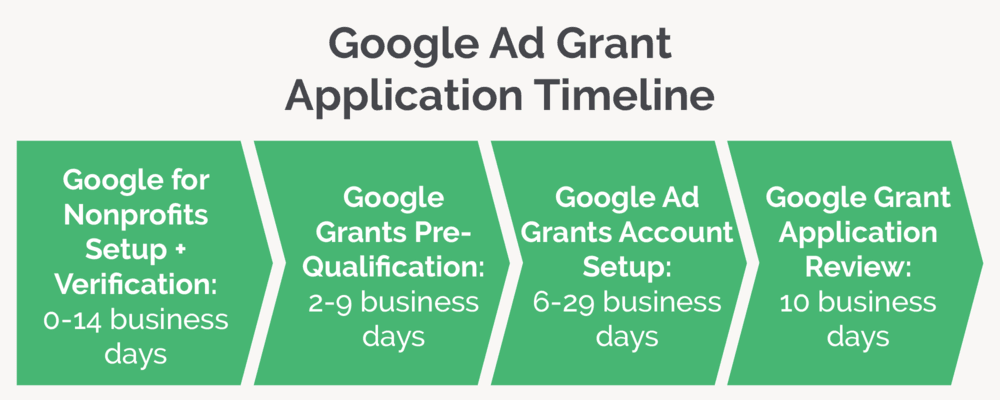
- Google for Nonprofits setup + verification: Up to 14 business days
- Google Grants pre-qualification: 2-9 business days
- Google Ad Grants account setup: 6-29 business days
- Google Ad Grant application review: up to 10 business days
In total, the application process could take a month or two, and this doesn’t include the time you’ll need to spend setting up your account once you’re approved. If you’re worried about the time and effort the process requires, consider turning to a Google Grants agency for help.
3. Learn Google Grants best practices
While you wait on approval from Percent and Google for Nonprofits, take time to read up on Google Ad Grant best practices so you can hit the ground running once you’re approved. Look through the information and tips Google provides on the official Ad Grants website. You can even take an entire video course on how to run successful ad campaigns for free.
We also suggest checking out the resources provided by Getting Attention, our recommended (and fully certified) Google Grants management agency. Learn about website best practices, ad management tips, and more. By the time your Google Grant application gets approved, you’ll already be well on your way to success.
Wrapping up
Once you finish the application process and receive the grant, work on using the grant as effectively as possible. Stay on top of your campaign management, and don’t be afraid to get help from professionals. Google Grants can provide your organization with a wealth of benefits, but only if you give it the right attention!
If you’re eager to learn more about how to apply for Google Grants and put your grant to use, check out this selection of additional resources:
- How to Optimize Your Google Ad Grant Account in 6 Steps. Dive deeper into the details of how to set your Google Ad Grant account up for success.
- How to Promote Matching Gifts with the Google Ad Grant. The Google Ad Grant isn’t just a tool for finding new supporters, it can also support your matching gifts campaigns! Learn how to use your grant to advertise the impact of matching gifts.
- Nonprofit Advertising Guide: Practical Tips and Examples. See how the Google Ad Grant fits in with a broader nonprofit advertising strategy and get inspired by successful examples.